Android development could be started with free of cost as all the development environment is open source and could be freely downloaded from the internet. Here I am going to explain how to configure your machine for Android development for an existing Eclipse IDE. This post deals with the configuration of Eclipse for the development of Android applications in Windows machine.
Pleas Note: You can download the complete Android configured Eclipse IDE package from the developer site: http://developer.android.com/sdk/index.html. (ADT plugin for windows). You need to proceed only if you need to integrate Android with existing Eclipse.
Setting up an Android development environment is very much easier and could be completed just with few steps. Before proceeding you should make sure your system meets the following requirements.
Step 1: Downloading the Eclipse IDE
First step is to download the development IDE, Eclipse 3.6.2 or later (Juno) from http://www.eclipse.org/downloads. Here I downloaded Eclipse 3.5 Galileo 32 bit Windows version [Please note: New ADT is no longer supported by Eclipse 3.5 version, so it is recommended you to proceed with Eclipse 3.6.2 (Helios) or later]. Download it and unzip to any desired location.
Step 2: Downloading SDK Starter package
You can download the Android sdk starter package from http://developer.android.com/sdk/index.html. (link under - use an existing IDE).
So far, we have downloaded Eclipse IDE and Android sdk starter package to two different folders. Our next step is to link these two and Make Eclipse to work with Android sdk. Android offers a custom plugin for the Eclipse IDE, called Android Development Tools (ADT), that is designed to give you a powerful, integrated environment in which to build Android applications. It interconnects your Eclipse and Android sdk starter package and extends the capabilites of Eclipse to let you quickly set up an excellent Android working environment.In general, developing in Eclipse with ADT is a highly recommended approach and is the fastest way to get started with Android.
In order to install Android plugin in Eclipse Just jump to Help->Install New Software and in the Install console click on the Add button in the top right corner.


Cheers,Pleas Note: You can download the complete Android configured Eclipse IDE package from the developer site: http://developer.android.com/sdk/index.html. (ADT plugin for windows). You need to proceed only if you need to integrate Android with existing Eclipse.
Setting up an Android development environment is very much easier and could be completed just with few steps. Before proceeding you should make sure your system meets the following requirements.
- JDK 6 or later (JRE alone is not sufficient)
Hardware Requirements:
The installation also needs some hardware storage space as mentioned below.
If you meet all these requirements, you are ready to go.| Component type | Approximate size | Comments |
|---|---|---|
| SDK Tools | 35 MB | Required. |
| SDK Platform-tools | 6 MB | Required. |
| Android platform (each) | 150 MB | At least one platform is required. |
| SDK Add-on (each) | 100 MB | Optional. |
| USB Driver for Windows | 10 MB | Optional. For Windows only. |
| Samples (per platform) | 10M | Optional. |
| Offline documentation | 250 MB | Optional. |
Step 1: Downloading the Eclipse IDE
First step is to download the development IDE, Eclipse 3.6.2 or later (Juno) from http://www.eclipse.org/downloads. Here I downloaded Eclipse 3.5 Galileo 32 bit Windows version [Please note: New ADT is no longer supported by Eclipse 3.5 version, so it is recommended you to proceed with Eclipse 3.6.2 (Helios) or later]. Download it and unzip to any desired location.
Step 2: Downloading SDK Starter package
You can download the Android sdk starter package from http://developer.android.com/sdk/index.html. (link under - use an existing IDE).
Downloaded the Windows installer (
.exe file), run it now and it will check whether the proper Java SE Development Kit (JDK) is installed (installing it, if necessary), then install the SDK Tools into a default location (which you can modify).
Make a note of the name and location of the SDK directory on your system—you will need to refer to the SDK directory later, when setting up the ADT plugin and when using the SDK tools from the command line.
Step 3. Installing ADT plugin for EclipseSo far, we have downloaded Eclipse IDE and Android sdk starter package to two different folders. Our next step is to link these two and Make Eclipse to work with Android sdk. Android offers a custom plugin for the Eclipse IDE, called Android Development Tools (ADT), that is designed to give you a powerful, integrated environment in which to build Android applications. It interconnects your Eclipse and Android sdk starter package and extends the capabilites of Eclipse to let you quickly set up an excellent Android working environment.In general, developing in Eclipse with ADT is a highly recommended approach and is the fastest way to get started with Android.
In order to install Android plugin in Eclipse Just jump to Help->Install New Software and in the Install console click on the Add button in the top right corner.


Once you click on the Add button,"Add site" console will popup and in that give Name as "ADT plugin" and Location as https://dl-ssl.google.com/android/eclipse/ and then click OK button.

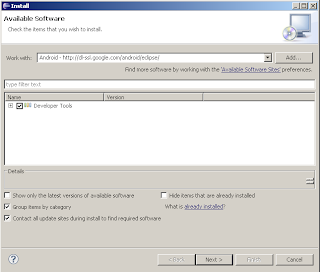
Under the "Work with" in the previous Install console, select your added site. Then all the uninstalled tools will be listed below. Select the check box next to Developer tools and click next. Read and accept the terms and condition and then click finish. When the installation completes, restart Eclipse.
Note: If you get a security warning saying that the authenticity or validity of the software can't be established, click OK

Step 4: Adding platforms and other components
When you restart the eclipse, you could see Android SDK Manager and AVD Manager (tools included in the SDK starter package to download essential SDK components into your development environment) under Windows menu and also in the toos icon.
To develop an Android application, you also need to download at least one Android platform and the associated platform tools. You can add other components and platforms as well, which is highly recommended.
Our next step is to launch SDK Manager tool to install any one of Android platform to work with. We can launch this either from Eclipse or by double clicking on the SDK Manager.exe inside the Android SDK Starter package.

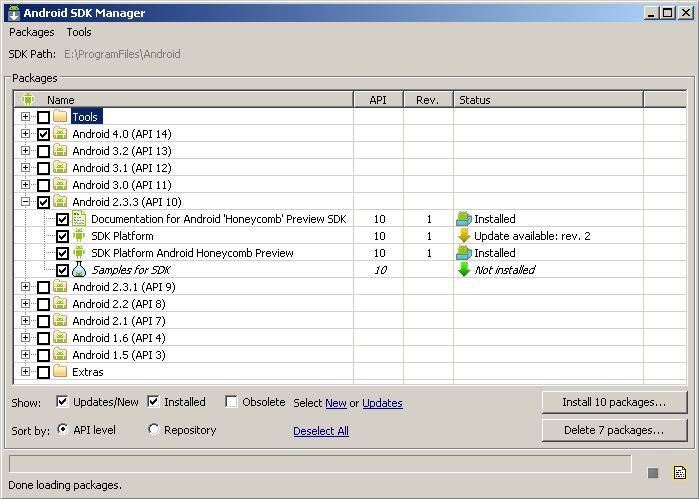
In the available package, check the desired Android platform you are going to work with (check all the sub check boxes in that particular platform) and click install. Now, that particular Android platform sdk will be downloaded to your machine. You can also download various debugging and optimization tools later, which is highly recommended.
Step 5: Link Your Platform to Eclipse
Once you have completed these steps, the final step is to link your downloaded sdk to the Android Eclipse plugin. This could be done by giving the Android installed folder location (the location where you unzipped your Android SDK Starter package in step 2) under Windows->Preferences->Android->SDK Location. Once this is given, click on Apply, then all the installed sdk will be listed and finally click on the OK button.


Thats it. You have done with creating Android working environment. To check with, click on the File->New->Android Project, in the new Project Console, give your Android project name and click next, if you could see your installed sdk s inside build target, you are ready to go!
Have a nice day. View Complete List of Tips
