This post deals with how to create an Android Virtual Device (AVD) in your windows machine.
Once you configured your system for Android development, you have to create an Android virtual device (AVD) to simulate your application that is being developed. Once you create an Android virtual device you can install apk files to that Emulator, view output from Eclipse IDE, debug your application etc.
You can create AVD using AVD Manager.exe. It can be invoked either from Android installed folder or from Eclipse, from menu Window-> AVD Manager (If you are not updated your Android plugin, it will be under Window->Android SDK and AVD Manager ).


Once you launch the AVD Manager, you can create a new AVD by clicking on the "New" button on the top right corner of the window.

Then "Create New AVD" dialog is appears. Here you will fill the details of the virtual device that you are going to create. Give a Name to your Emulator, select a target platform, SD Card size (optional), and click on “Create” button. You finished creating your first Android Virtual device. Way to go!

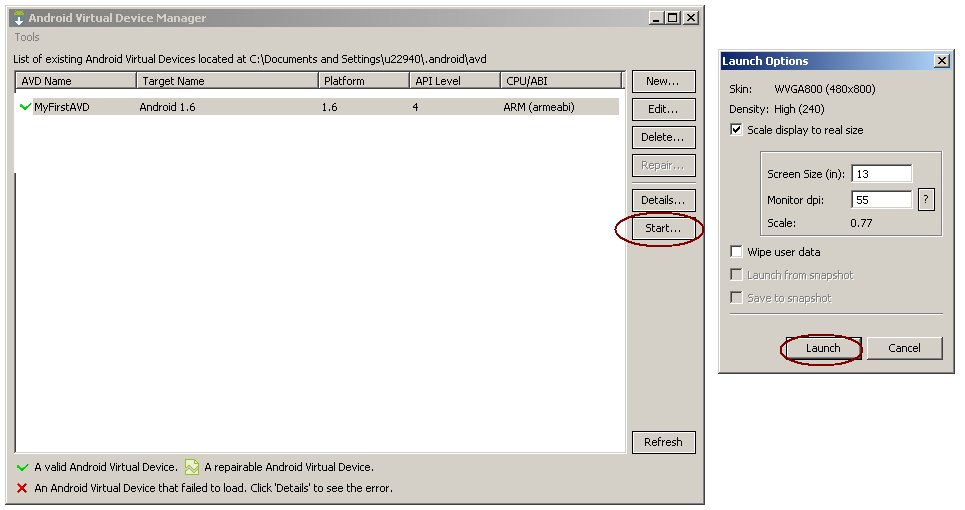
Once you finished with your Emulator, your emulator will be displayed in the existing AVD devices in the AVD manage. If it is a valid one, you could see a green tick mark on the left side. Select the created Emulator from the list and click on the start button. A Launch option dialog will get appeared, where you can set your Emulator scaling.

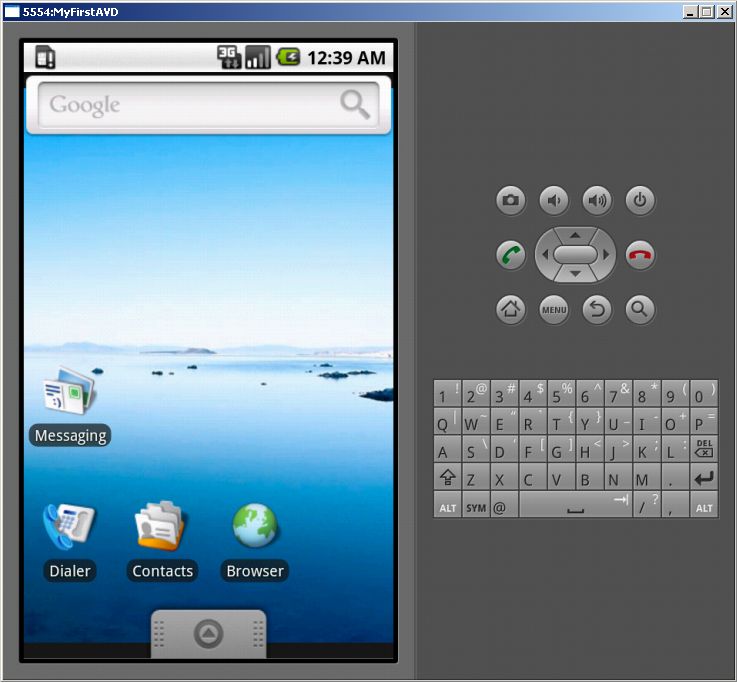
You can wait for some time to get your Emulator launched. Just slide the lock icon to get it unlocked. Enjoy the Emulator, if you are experiencing for the first time.

Cheers,
Have a nice day. View Complete List of Tips
Once you configured your system for Android development, you have to create an Android virtual device (AVD) to simulate your application that is being developed. Once you create an Android virtual device you can install apk files to that Emulator, view output from Eclipse IDE, debug your application etc.
You can create AVD using AVD Manager.exe. It can be invoked either from Android installed folder or from Eclipse, from menu Window-> AVD Manager (If you are not updated your Android plugin, it will be under Window->Android SDK and AVD Manager ).


Once you launch the AVD Manager, you can create a new AVD by clicking on the "New" button on the top right corner of the window.

Then "Create New AVD" dialog is appears. Here you will fill the details of the virtual device that you are going to create. Give a Name to your Emulator, select a target platform, SD Card size (optional), and click on “Create” button. You finished creating your first Android Virtual device. Way to go!

You can add properties to your AVD, by clicking on the “New” button in the Hardware section of the above window. You can specify following properties to your Emulator.
Characteristic
|
Description
|
Property
|
Device ram size
|
The amount of physical RAM on the
device, in megabytes. Default value is "96".
|
hw.ramSize
|
Touch-screen support
|
Whether there is a touch screen or
not on the device. Default value is "yes".
|
hw.touchScreen
|
Trackball support
|
Whether there is a trackball on the
device. Default value is "yes".
|
hw.trackBall
|
Keyboard support
|
Whether the device has a QWERTY
keyboard. Default value is "yes".
|
hw.keyboard
|
DPad support
|
Whether the device has DPad keys.
Default value is "yes".
|
hw.dPad
|
GSM modem support
|
Whether there is a GSM modem in the
device. Default value is "yes".
|
hw.gsmModem
|
Camera support
|
Whether the device has a camera.
Default value is "no".
|
hw.camera
|
Maximum horizontal camera pixels
|
Default value is "640".
|
hw.camera.maxHorizontalPixels
|
Maximum vertical camera pixels
|
Default value is "480".
|
hw.camera.maxVerticalPixels
|
GPS support
|
Whether there is a GPS in the device.
Default value is "yes".
|
hw.gps
|
Battery support
|
Whether the device can run on a
battery. Default value is "yes".
|
hw.battery
|
Accelerometer
|
Whether there is an accelerometer in
the device. Default value is "yes".
|
hw.accelerometer
|
Audio recording support
|
Whether the device can record audio.
Default value is "yes".
|
hw.audioInput
|
Audio playback support
|
Whether the device can play audio.
Default value is "yes".
|
hw.audioOutput
|
SD Card support
|
Whether the device supports
insertion/removal of virtual SD Cards. Default value is "yes".
|
hw.sdCard
|
Cache partition support
|
Whether we use a /cache partition on
the device. Default value is "yes".
|
disk.cachePartition
|
Cache partition size
|
Default value is "66MB".
|
disk.cachePartition.size
|
Abstracted LCD density
|
Sets the generalized density
characteristic used by the AVD's screen. Default value is "160".
|
hw.lcd.density
|
Trackball support
|
Whether there is a trackball present.
|
hw.trackBall
|
Cheers,
Have a nice day. View Complete List of Tips
